Tabs

Showing posts with label AMuse. Show all posts

Sunday, October 28, 2012

Birthdays *really* Are Best!

Happy Sunday everyone! So glad to be back after a minor procedure a week ago. It seems to have sucked the mojo out of me! :-) It's hard to do anything when you feel exhausted after doing anything. On Thursday, I did go with friends on a Carolina Shop Hop; boy did that ever just knock me out! We went to 5 stores in South Carolina (we never made it to any NC stores). It was a fun day, but I think it was too soon after my procedure and really took me til yesterday to recuperate! Anyway, birthdays are on my mind, especially with mine coming up in a couple of weeks. I thought this image by 2 Cute Ink would make an adorable birthday card.


Supplies:
Stamps - balloon birdie (2 Cute Ink); birthdays are the best (AMuse)
Cardstock - green, peach, yellow (stash); Cafe Mediterranean (DCWV)
Copics - YR01, YR02, YR12, YR14, YR15, YR24, G40, G43, G46, Y21, YR31, Y35, B0000, 0
Ink - tuxedo black (Memento)
Other - Spellbinders dies, yellow gems, pop dots

That's it for now chickies... Have a great rest of the weekend and a wonderful week! I'll see ya again next Sunday. :-)

Hugs, Margaret

Monday, March 7, 2011

More Easter Cards

I feel like I'll never finish all the projects in my project pile! Most of what I'm working on is stuff I've prestamped within the last couple years and just haven't gotten back to it. There's an upside and a downside to that. The upside being that you already have the stamped image and don't have to cut up the paper or pull out the different inks. The downside is that once you finally get to the project, you've forgotten what you were going to do with it! Not to mention that by the time I get to it, I would have preferred for it to have been cut differently. Oh well... I had a lot of fun doing these two cards. First off, I LOVE DeNami and Elzybells chick stamps. They are too stinkin' cute!


Stamps - Elzybells Easter Chick, MFT sentiment from Hoppy Easter
C/S - SU! lavender lace, Memory Box lavender, Hobby Lobby petunia, Paper Source chartreuse, Neenah avalanche white, unknown pp
Ink - Memento tuxedo black ink
Copics - Y11, Y13, Y15, Y17, R20, YG03, YG09, YG17, G24, V12, V15, YR65, YR16, BG11, BG32, BG34, R81, R83, R85, BG01, BG02, BG05, lavender Spica
Misc Supplies - unknown ribbon, white gel pen, SU! word window & modern label punches, Spellbinders scalloped ovals & classic oval, tiny white pearls


Stamps - DeNami Design Easter chick basket, AMuse eggstravaganza
C/S - Memory Box aqua & lavender, Neenah avalanche white, unknown pp
Ink - Memento tuxedo black, VersaMagic turquoise gem
Copics - BG11, BG13, BG23, BG49, V12, V15, V17, Y11, Y13, Y15, YR16, YR65, turquoise Spica
Misc Supplies - SU! scalloped circle punch, Marvey Clever Lever scalloped oval punch, Martha Stewart border punch, unknown ribbon


Time to go plant some herbs, lettuce, & beans. I'm so looking forward to nice warm weather so I can go outside and get my hands in the dirt. Did a lot of work last summer on compost piles. Hopefully this will help my garden grow better because last year was positively horrible! For all the work I did, I practically had nothing to show for it. I'm thinking positive though... this year will be a great garden year!

Happy stamping til the next time!

Friday, February 25, 2011

Easter/Friend Card

Here's a card I made today inbetween going through all my old stamps, cleaning through all Club Scrap/Stamp kits, and trying to get my butt moved completely back into my craft room. Everything is such a mess! I knda feel like I'm never going to get everything straightened out and mostly that I need a bit more room. I could take over my son's old bedroom, but I think hubby would have a fit. :-)

I knew exactly how I wanted this card to look! You know, I have always wondered exactly why I would need the petite versions of the classic Spellbinders dies and now I know. I really wanted the purple scalloped oval to be about an 1/8" bigger. Guess I'll have to put those petite sizes on my wish list. It still turned out so cute and I would have preferred for it to be a true Easter card, but when I saw that I had this AMuse sentiment that goes with this bunny, I had to use it.


Stamps - AMuse bunny basket, all ears, and tiny egg
C/S - Memory Box yellow & water blue, Hobby Lobby lilac, AMuse lime kitchen dot, Reminisce Easter Chick pp
Ink - Memento Tuxedo black, new sprout, lulu lavender, angel pink
Copics - 0, B000, RV10, G40, V12, V15, V17, YG03, YG06

 
Tomorrow's post will be using the Elzybells chicks. I just love those little stamps!

Happy stamping till the next time!

Wednesday, January 26, 2011

AMuse Card Share

Today's share will be some cards I made using AMuse Artstamps. I especially like AMuse even though the stamps are very small and a bit more can go into making the cards. The images are super cute! When, and if, I find the recipes, I will update the supply lists.


Supplies: AMuse stamps (on card), SU! stamps (on envie), Amuse & Memory Box c/s, Marvey rectangle punch, tiny pumpkin punch from Michaels


Supplies: AMuse stamps, AMuse & Memory Box c/s, Copic markers, Spica pens, Martha Stewart border punch, AMuse sheer ribbon


Supplies: AMuse stamps, AMuse & Bazzill c/s, Copic markers


Supplies: AMuse & Printworks stamps, unknown pp, SU! wide oval punch, Spellbinders scalloped oval, corner rounder, misc ribbon


Supplies: AMuse stamps, Memory Box & SU! c/s, AMuse ribbon, Copic markers, dimensional glaze, white gel pen, AMuse ribbon, pop dots, Prima flowers, circle punches


Supplies: AMuse & Savvy or Impress stamps, misc c/s, Stardream gold c/s, Cuttlebug embossing folder, Copic markers, Spica pens, misc ribbon


Hope you liked these cards. I enjoyed making them!

Happy stamping til the next time!

Wednesday, October 27, 2010

Halloween Goodies

Finished up my Halloween goodies this morning, but just couldn't get my butt out of the house today. The phone didn't stop ringing! Sometimes, you just have to go with the flow 'cause it was one of those days... So, tomorrow I will be out and about with my goodie basket. Yum!

This treat bag was made using Witch Way to the Treats by JustRite Stamps. Such a cute set with 10 centers and borders. The only coloring I did was on the topper with an orange marker and then I went over it a bit with an orange Spica. Since the ribbons are satiny, sheer and have a bit of metallic threading, the Spica was the perfect way to give it that finishing touch of sparkle. To compensate for the little bit of room left above the treats, which are mini peppermint patties, I ended up using some text weight paper and lightweight cardstock to make my own filler. Can't say I'd be too anxious to do that again! :-)

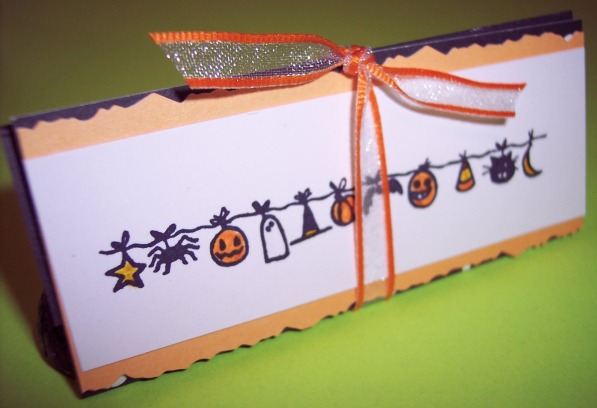
This treat is actually a tent style treat holder that I saw somewhere last year. I used an AMuse Halloween stamp (can't think of what it's called and I've misplaced it for now). The stamp is neat because it has so many cool little things hanging from the line. Love using it! I also used my orange, yellow, black, and clear Spicas to color in the images so the sparkliness (is that even a word??) matches the treat bags.

Last year I found a nice back and orange basket at Hobby Lobby that I decorated for Halloween to display my cards. This year I put the all the goodies along with my cards and an adorable little Halloween teddy in the basket. It turned out so cute! I had so much fun pulling everything together and setting up the basket perfectly. You can't tell, but underneath everything is filler that I ended up dying with reinkers to match the colors used throughout the basket. As the basket empties out the filler will be seen but blend in with everything else.

Next up... Thanksgiving and Christmas. Is it that time already? I am ready to get started on making these cards. I've already made my first Thanksgiving card. You're going to have to wait for that share on another day, but I know you'll like it!

Happy stamping til the next time!

Saturday, September 4, 2010

Cards Cards Cards

I hate that I haven't been able to post much this summer. I've been so busy doing stuff outside and unfortunately since it takes me so much longer than the average person, I feel like I'm never going to get done! Hence, my decision... I am going to make posting a priority because I've come to realize that whether I make time to post or not, everything else (house, yard, etc) is not going to get done any quicker!! 

Supplies are Stampin' Up! unless noted 
Stamps: Awash With Flowers & Teeny Tiny Wishes 
C/S: Melon Mambo, Only Orange, Tempting Turquoise, Whisper White, ? dsp 
Ink: Melon Mambo, Only Orange, Yoyo Yellow, Orchid Opulence, Old Olive 
Tools: scallop edge punch, word window, beautiful wings embosslit, perfect polka dots embossing folder, trimmer, scissors, hole punch 
Misc: Melon Mambo dotted ribbon, rhinestone brad, Hero Arts & other various adhesive rhinestones, glue dots, adhesive, Signo white gel pen, sponge, envelope is not SU!


Here are the cards completely finished as either a Mother's Day or birthday card. The card was actually started in the monthly SU! club I go to. I don't usually finish them completely until I get home and then I never know what I'm going to end up with! Instead of using the melon polka dot ribbon for the "bow" in this card, I used a piece of ribbon from my own stash that matched the melon perfectly. Also, whenever I use embossing folders, embosslits or anything that will give me a design to work with, I will most likely take my white gel pen to it. Recently, I found another white gel pen that works very well and is super inexpensive at Michael's. It's in their individual marker section, by Marvy and called Gel Extreme. The colors available, as far as I can tell, are black, white, red, green, gold, and silver. They have a nice fine point too! I've only been using them for about 2 weeks, but so far so good.


This card was my actual Mother's Day card. I didn't use as many rhinestones on it and the butterflies are the smaller ones that were left over. Still super pretty and my mothers just loved it!

The next card I share is an all occasion style card. I thought it would make a pretty Father's Day card, but then I ended up using something else. The Kraft (or now crumb cake) as well as Sahara Sand cardstock is always so pretty to work with. For some reason those colors give the card an elegant type of look.

Supplies are SU! unless noted 
Stamps: Fifth Avenue Floral, Very Vintage wheel 
C/S: Basic Black, Purely Pomegranate, Sahara Sand 
Ink: Creamy Caramel, StazOn black, AMuse black dye 
Copics: ?? 2 colors used on envelope 
Tools: perfect polka dots embossing folder, trimmer, scissors 
Misc: 5/8" black satin ribbon, Micron 05, Signo white gel pen, pop dots, clear rhinestones, sponge
The finished product! I was very pleased with how this card turned out. It's another that was started at club and I changed it once I got home. Decorating the envelopes is something I love to do because it gives the card a "completeness." I'm not super crazy about how the flower on this card turned out, but it will have to do. :-) I just used 2 Copics and tried to give it a brush stroke look, but it wasn't wanting to cooperate with me. Overall, I really like it. This is one of my favorite sets. One last card and I will REALLY try to post again tomorrow or Monday. Hey, I am trying to turn over a new leaf here...


Card stamps: Hero Arts Friend cling foam stamp 
Envie stamps: AMuse leafy vine, tiny daisy, mini flower 
C/S: AMuse blue kitchen dot & red check, Neenah Classic Crest white 
Card ink: AMuse black dye 
Envie ink: SU! Garden Green, Real Red, Ballet Blue, Yoyo Yellow 
Copics: YG01, YG13, YG67, Y13, Y17, YR16, YR18, B0000, B26, B37, B39, R29, R39, 0 
Tools: trimmer, scissors 
Misc: pop dots, glue dots, Martha Stewart winding leaves ribbon, 2mm & 4mm red rhinestones


Hope you enjoyed the samples. My next post will show some of the goodies I picked up at the CK Convention that was in Charlotte about a month ago.

Happy stamping til the next time!

Sunday, March 28, 2010

Friday Card 2 Days Late!!

Good morning stampers! Friday morning I created the card I'm about to share with you, but "life" got in the way. We sold our treadmill, which lead me to clean (way too much), which then made me spend the rest of Friday and Saturday in bed! I should and do know better, however, even though I was in terrible pain, it felt good to get something completely accomplished. I'm still sore today, but not bad enough to hold back this card another day. :-)

This is not a Christmas card. It is, however, the perfect card to send out after Christmas to anyone you may have missed or with whom you have recently reconnected. It would also be a perfect Happy New Years card for anyone who doesn't send out Christmas cards. The cards and envelopes I used were from Paper Source. I don't think they have them anymore as I got them on clearance last year.


I hope you can see the detail of the image below. Initially, I colored the champagne with Copic E55 and went over it with the sand Spica pen. That wasn't quite getting the look I wanted so... I used a clear Gelly Roll pen (which always looks more platinum in color to me) and lastly went over both glasses with a clear Glaze pen. I think if you click on the image, you will get a bigger image and see more clearly what I'm describing. The clear Gelly Roll really did the trick though and no, I didn't clear Glaze the bubbles.


Card details... stamps - AMuse part silhouette, Amuse bubbly, AMuse super dot, SU! print patter bg; cardstock - Paper Source blush cards with stripe envelopes, Paper Source light blue cards with harlequin envelopes, Neenah 80 lb white, Neenah text (folded inside card), Hobby Lobby black texture; ink pads - SU! blush blossom, SU! soft sky, AMuse black dye, CB chalk creamy brown; Copics - E55; Spicas - sand; pens - Gelly Roll clear, Glaze clear; supplies - AMuse black sheer ribbon, Amuse tutu sheer ribbon, AMuse white sheer ribbon, AMuse light blue sheer dot ribbon, pop dots, glue dots, adhesive; tools - Sizzix Big Kick, 3rd smallest classic oval Nestie, 3rd smallest classic scallop oval Nestie.

For those of you who are familiar with the SU! spots, you will notice that I have a spot in my pic below of Soft Sky, which was an In Color from 2007-08. Since I don't particularly care for the SU! ink pads, I buy blank spots, ink them up with any new colors that come out and voila! I have my own little pads for the In Colors. I actually do this with any company's reinkers that I want in a small style pad.


Happy stamping til next time!

Friday, March 19, 2010

Today's Card

Good morning stampers! Last year, I decided that I was going to start my Christmas cards early and make several a month so I wouldn't be so far behind by the time Christmas comes this year. For many years, I sent my cards out the day after Thanksgiving; however, once I became disabled, it was very difficult to get everything holiday related done (baking, decorating, shopping, present wrapping, etc) much less get cards NOT handmade signed, addressed, and mailed out in time for Christmas. Even though it's already March, I am proud to share with you my first Christmas card of the year below.

Card details... stamps - Elzybells sending winter wishes, AMuse enjoy the wonders MA; card stock - Hobby Lobby sea blue & mood blue, AMuse red kitchen dot, Georgia Pacific white, Neenah; ink pads - StazOn black, AMuse black dye, VersaMagic aspen mist; Copics - B91, B95, B97, C00, YR24, B0000; supplies - 1/4" light blue loopy edge ribbon, AMuse sheer red ribbon, 1mm "pearl" strand, frosted lace stickles, 05 Micron pen, pop dots, glue dots, adhesive; tools - EK Success snowflake edge punch, 3rd & 4th (from the smallest) classic scallop circle Nesties, 3rd (from the smallest) classic circle Nesties, Japanese drill punch, Sizzix Big Kick.

Envie details... stamps - AMuse enjoy the wonders MA, MB holiday bird; Copics - G05, G19, B00, YR16, R29, R59, Y11, Y17, 0, gold Spica.


I don't have tons of cards to make as everyone does not get a handmade card... especially if I know the person doesn't save it! That sounds awful, but I put a lot of time and effort into my cards so I like to know that the people who get them will cherish them. Last year the only card I got to make took me at least 1 hour to make each one. Needless to say, I only made 12. Plus, that's all the time I had anyway, hence, getting an early start this year. :-) I have to say that it was very relaxing once I got into it. Of course hubby thought I was out of my mind, which wasn't the first time and probably won't be the last. LOL Here's the card from last Christmas:


I love Great Impressions stamps and own a nice little collection of them (mostly Christmas) so you will be seeing more GI cards as I make my Christmas cards this year. This card was so much fun once I figured out how I wanted the elements to come together. The picture really doesn't do it justice.

Card details... stamps - Great Impressions Build a Snowman (from 11/04 collection), Savvy Merry Christmas; cardstock - Hobby Lobby (HL) dark grey, Stardream Chiara pink, HL ice, HL lavender, unknown shimmery pp with winter words in pale colors, Neenah; ink pads - AMuse black dye, StazOn black; pens - 05 Micron brown; Copics - B000, B01, B05, BV11, BV17, C1, C5, C7, E41, E44, E59, N4, N5, N7, N9, R20, RV13, RV17, W1, Y28, YR04, YR09; Spicas - silver, black, gold; supplies - Martha Stewart white craft seam binding, pop dots, glue dots, adhesive; tools - classic square Nestie, SU! scallop border punch.

My favorite dye ink to use with Copics is by AMuse. I've tried others, but do not get the same results. Usually I stamp the sentiments in StazOn just because it dries very quickly. As you can see, I love to decorate the envelopes when I can. Hero Arts came out with a bunch of cute little stamps last year that I could NOT resist. They are perfect "envelope stamps!"

This year I want to experiment with digital stamps. I've bought several already, but have yet to do anything with them. Once I get something done, you'll be the first to see. What I like about them is that they can be resized and layered together to make a sort of "scene". Something you really can't do with your regular stamps unless you stamp it, scan it into your computer, and then resize it. A little too much work for me right now. I can't wait to work with them though. Hmmm, maybe I'll surprise you with a card this weekend; no promises though!

Happy stamping til next time!