Tabs

Sunday, July 24, 2011

The Altering Project(s)

Did you ever see a fabulous deal for some type of decorative item, but didn't quite like the colors or maybe it was a bit beat up? Even though it may look rough, you just knew you could fix it so it would look totally beautimous in your favorite room. Well, something similar to this happened to me recently except that I wasn't the one finding the great deal, a friend of mine did. Her daughter is turning 30 and she wanted to do a black and white theme. She found a really nice hanging plaque in Hobby Lobby for a fabulous price. The only problem was that it needed a color change. This is where I come in since I do crafts. :-) We also picked out her daughter's initials and 3 metal words (Live, Love, Laugh) for me to work on. Do you know how many styles of initials are out there and how many DO NOT go together at all? We decided to go to the craft stores together to find the perfect letters plus we needed to find something to "fix" the plaque with. Definitely paint and maybe some nice rub-on wording would fit the bill. 

So far it's sounding pretty simple, huh? The first problem was spraying the metal words. I mean it's just a bit of some black glossy spray. How hard could that be? I ended up having to wet sand, spray, and respray the words several times. Bubbles kept popping up while I was spraying. The icing on the cake was when I was spraying and the spray can got stuck ON. It was everywhere including all over me!! Besides me, it got all over a deck chair and the deck. I should have been spraying in the grass... aaaackkk!!! That can is so going back to Wal-Mart if I can find my receipt!!

The plaque was another comedy of errors. I knew I would have to sand the center to get some of the wording and paint off. That done, now I was on my way to getting this baby finished. NOT!! I couldn't get the wording to cover nicely or get the paint on smoothly. So here I was *again* wet sanding and painting over and over. Good grief! I finally decided to give gesso a try. Why did I not do this in the first place?? Gesso totally did the trick! Now I was on my way. I wish I would have taken a before and after picture. It turned out so nice! I love it! Here are a few pics. It was difficult getting a nice up-close of it; the gems and pearls aren't showing up the way your eye would see it, but you get the idea.

These initials were so much fun to do that I've bought myself several different kinds that I plan on altering to hang on my craft room wall. I love the fact that the paper on the "J" matches the plaque. The patterns are both damask, but they are opposite; the plaque is white on black and the "J" is black on white. That wasn't even planned! I love it when things come together like this. :-)

This is one of the many things I've been doing over the past few weeks. I couldn't post til today because her birthday party was last night and that's when this was being given to her.

The next week or two will be busy because my 12-year old niece is coming to visit. I'm so looking forward to having her! All kinds of fun stuff planned! We're going to be cooking, baking, going to the pool, reading (she's an avid reader just like me), stamping, shopping, and whatever else I can do to keep us busy. I'm expecting her to want to stay more than a week because I don't think a week is long enough to do everything in. We'll see. It's her first time away from home and she may want to stay but be homesick. 

OK, enough for now. I'll try to schedule some posts so I don't stay away for too long.

Happy stamping til the next time!

Saturday, July 16, 2011

Not Enough Time

I feel like there's just not enough hours in the day lately. Too many things going on and nothing is getting finished! Still working on my craft room. I was hoping to have it finished within the next week or two, but some other things have come up and it's just not gonna happen. Oh well... Maybe I should just make it my goal to have it all done by the end of summer. :-)

Here are a few cards I've worked on. I don't have recipes because I was lucky enough to get to work on them to begin with. Just didn't have the chance to stamp AND write down the recipe. I know you'll enjoy them regardless.

This card was originally posted in January, but I never liked the coloring and felt like it needed something more. It looks so much better this way! All stamps are AMuse and the paper is AMuse & Memory Box. Ink was VersaMagic turquoise gem.


This card was done using Twinkling H2Os. I love working with these and don't use them often enough. Stamps & card stock are Stampin' Up!. The pattern paper and ribbon is out of my stash. I think this stamp has been discontinued... Has anyone seen the new catalog? I have way too many pages marked for sets I want. Like I need more stamp sets! I still have a bunch I cleaned out that I need to get rid of!

I was looking through my stamps, trying to find something "different" to do and came across this one. I've had this stamp for many years, but have never used it. At first I was going to watercolor or use Copics, but then I decided to go for a simpler look. I seem to be attracted to textures when working with animal stamps. Love the different items you can use to get that texture. I used a Magenta stamp for the background, some mulberry paper, and lastly some mesh. The deer stamp is from Stampabilities. Card stock is Stampin' Up. I used Close to Cocoa for stamping.

Happy stamping til the next time!

Sunday, July 10, 2011

Happy Sunday!

Good morning everyone! It's been a super busy week for me! I've been helping my sister by writing an employee manual for her restaurant, which will be opening within the month, and I'm down to the deadline. Hopefully it will be finished within the next couple days. In between working on the manual, I have taught a Copic class, finished a project I was working on for a certain someone (I will post pics when I mail it out and she receives it so I don't spoil her surprise), started a project for another certain someone, and have been helping my DIL's mother with a few projects that need to be complete before the end of the month. Phew! Somewhere in there, I managed to begin, but not finish a few cards. That's one of the things on my list to work on in between completing the manual. :-)

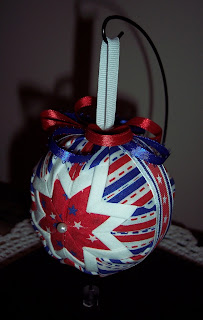
Last Monday, I completed another quilted ornament to go along with my 4th of July themed insert for my perpetual calendar. At some point, I'd love to be a month ahead in doing these quilted ornaments, but we all know how that goes! I should just take my calendar inserts with me when I go to the fabric store. lol It would make it soooo much easier! Anyhoo... I started and finished the 4th of July ornament last Monday, took pics to post here, and then got tied up in something else (probably dinner) and totally forgot to post! So, here we go. Hope you like them.

This plate insert was done a few years ago in a Stampin' Up! class I took with Kim Cagle. We made a years worth of inserts. They are 6" square and fit perfectly in the center of this glass plate. The plate has 2 BasicGrey magnets on it that link up with 2 magnets on the back of the insert. Little by little I would like to make some new calendar inserts just to switch things up a bit! Variety is the spice of life, you know! :-)


Here is the quilted ornament. I am so pleased with how it turned out. It's exactly how I envisioned it! The only thing that took me *for-evah* was the ribbon top. I can't even tell you how many times I pulled it apart and redid it. Yes, I am a bit, but just a bit (lol), of a perfectionist. Although, I do have to admit that stamping has taught me to be a lot more relaxed when it comes to my art. I don't even really worry about it anymore. Just go with the flow... Makes life soooo much easier! Less stressful. I once read that the Amish women purposely make a mistake in their quilts because no one is perfect but God. After reading that, the pressure to be perfect in my art was off! Now I only try to be perfect in everything else; like that really happens! lmbo I digress... the ornament, back to that. I got the fabric in Wal-Mart last summer. Don't know if they still have it or not. The ribbon around the center is from Wal-mart too. The ribbons at the top are from either Michaels, ACMoore, or Hobby Lobby. They're just your standard thinner width ribbon that I matched up to the fabric. When I do my organizational post on ribbon/embellishments, you will see that I have *tons* of ribbon. What is totally annoying about that, is when I go to do a project and don't like the way any, yes ANY, of the ribbons match up with the project. When you have that many spools of ribbon, you expect to find something in your stash that matches!

Here is the display on my little cabinet that I painted next to my front door. The ornament holder has a lid that creates a box display, but it's harder to take a nice picture with the lid on so I leave it off for the pictures only. My plan is still to do at least 12 of these. I'd like to have a few different ones for like birthdays, anniversary, or whatever special occasion falls between the holidays. And somewhere along the line, I'd like to make a couple baby ones. Not only is my DIL pregnant, but my neighbor's daughter is pregnant too. It would be nice to start a tradition of giving the grandchildren a handmade ornament either at Christmas or on their birthday. Probably birthday though. I can always do something else for Christmas, like, I don't know... how about Christmas ones?? lol

The cabinet the display sits on is something I'm very proud of. I made it well over 10 years ago in a Tole painting class. It took me 3 months to paint of which 10 weeks was in class. There was a lot of painting in between classes to get it finished though. Anyone who sees the cabinet loves it and thinks I should make them to sell! Little do they realize that #1 most people will spend an arm and a leg for something out of the Spiegel catalog, but they won't pay the same price for something handmade and #2 it takes way too much time to paint just one of these, much less several. I will take pictues of it for a post so you all can see it.

OK, gotta run for now. Still working on that darn room! If I don't stop taking on these projects, I'm never going to get it finished! My goal is to have it finished by the end of summer. There. It's written down. On the internet for all to see. I'm committed. Now I guess I'll further commit myself by writing it in *pen* on the calendar. :-)

Have a wonderful rest of the weekend and happy stamping til the next time!