Tabs

Wednesday, October 27, 2010

Halloween Goodies

Finished up my Halloween goodies this morning, but just couldn't get my butt out of the house today. The phone didn't stop ringing! Sometimes, you just have to go with the flow 'cause it was one of those days... So, tomorrow I will be out and about with my goodie basket. Yum!

This treat bag was made using Witch Way to the Treats by JustRite Stamps. Such a cute set with 10 centers and borders. The only coloring I did was on the topper with an orange marker and then I went over it a bit with an orange Spica. Since the ribbons are satiny, sheer and have a bit of metallic threading, the Spica was the perfect way to give it that finishing touch of sparkle. To compensate for the little bit of room left above the treats, which are mini peppermint patties, I ended up using some text weight paper and lightweight cardstock to make my own filler. Can't say I'd be too anxious to do that again! :-)

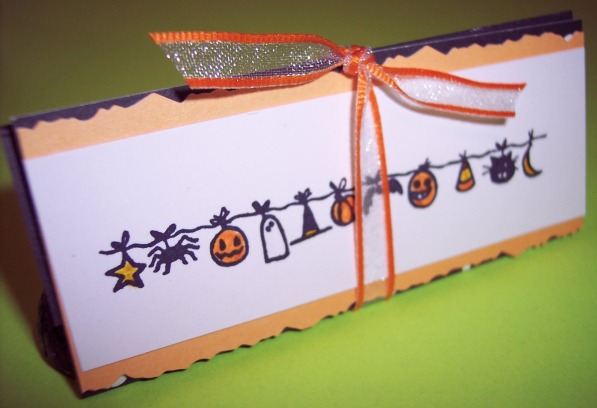
This treat is actually a tent style treat holder that I saw somewhere last year. I used an AMuse Halloween stamp (can't think of what it's called and I've misplaced it for now). The stamp is neat because it has so many cool little things hanging from the line. Love using it! I also used my orange, yellow, black, and clear Spicas to color in the images so the sparkliness (is that even a word??) matches the treat bags.

Last year I found a nice back and orange basket at Hobby Lobby that I decorated for Halloween to display my cards. This year I put the all the goodies along with my cards and an adorable little Halloween teddy in the basket. It turned out so cute! I had so much fun pulling everything together and setting up the basket perfectly. You can't tell, but underneath everything is filler that I ended up dying with reinkers to match the colors used throughout the basket. As the basket empties out the filler will be seen but blend in with everything else.

Next up... Thanksgiving and Christmas. Is it that time already? I am ready to get started on making these cards. I've already made my first Thanksgiving card. You're going to have to wait for that share on another day, but I know you'll like it!

Happy stamping til the next time!

Monday, October 25, 2010

Playing Catch-Up

As you can tell, I haven't posted as I thought I would be able to do, but I have good excuses!! Really, I do... I had such a busy busy summer straight through to the 2nd week of October. Now it's time to get back to business! I will try to catch-up on everything I've neglected through the summer. I promise...

Convention Haul Part 2

I was so darned excited when I saw all these little gems and pearls! They were a total steal! I don't remember what booth this was but everything on the one side of the booth was $1. I did as well as I would have in ACMoore or Michaels and better! I love using these embellishments. They really add the perfect touch to your handmade cards. I have bunches of these that I've been collecting and have them stored by color in this carry thingy I have; I'll take pics because it's stored so neatly, I have no problem getting the tiniest gem/pearl any time I need it.

Tessler Stamps (I think they're called although they seem to really be more about stencils) were the only ones at the convention that carried Copic Various Inks. Since I have been in desparate need for some time now, I took the plunge and bought several bottles. I still need a few more bottles, but I'm going to try and order 5-6 a month and eventually I'll have them all. Speaking of having them all, I only need 17 more Copics and I've got all the markers!! The missing colors are in the grays, which I will get because I notice how differently I am using the various gray families.

If you haven't tried the Copics, it is a must. They are alcohol based markers that are so different from your standard markers. Ranger & ProMarkers are also alcohol based, but the Ranger marker is huge and the ProMarkers don't have as many colors... although I would be interested in seeing how many colors they have that would fill in some of the Copic "gaps."

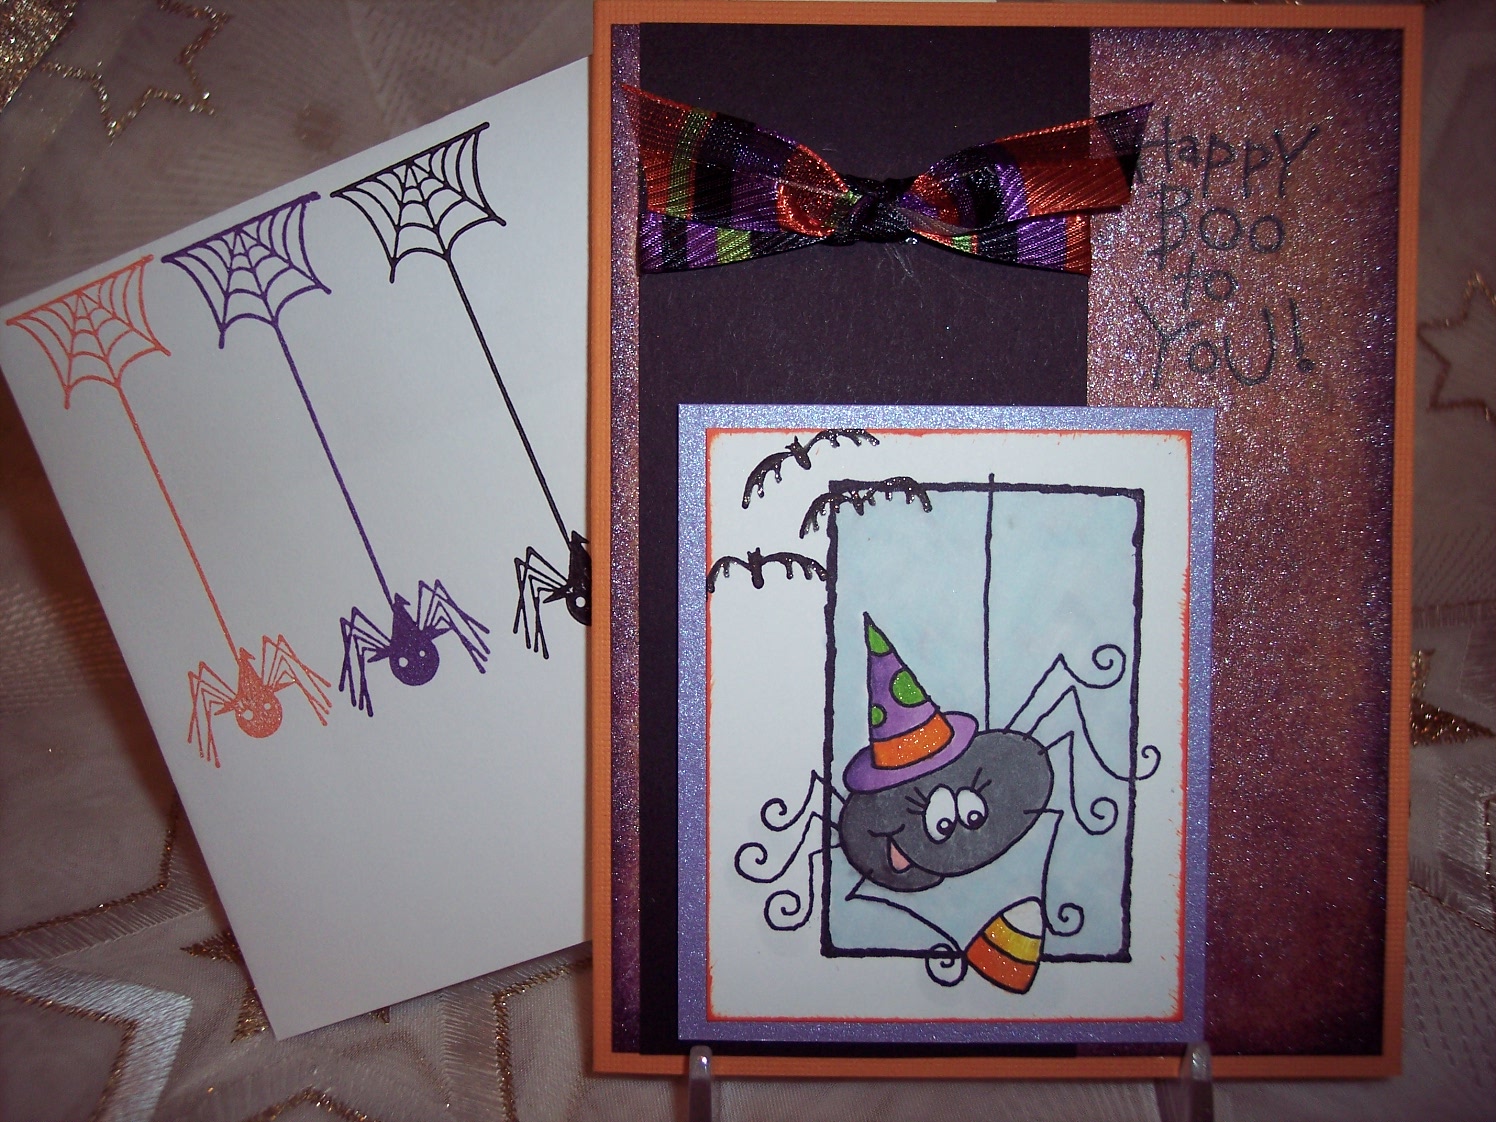
This was one item I had not counted on getting at the convention. However, they do those darn demos for a reason! I got all these bottles and believe it or not, I have colors I still need. I was making a Halloween card 2 days ago and really wanted a more plumy spray and an orange spray. Somehow, I have no orange. Or red. How can I still need more?? Talk about annoying... especially when you're in the middle of a project! I have to work on filling in those missing colors at some point. The colors are so pretty! I have enjoyed using them, which has been in full force where the whole background was covered and sparsely for a more delicate look. The Halloween card I did will be posted below; it's the one with the Stampendous spider with candy corn. Too cute!

Halloween Cards

I'm not super big on Halloween and only 1 person I know is, but I still wanted to make some cards this year. Here are a few that I finished up with this past week. The first 4 card pics were made with a SU! set that is discontinued. Don't ask what it is because I don't have it and stamped those images about a year ago. :-( It's probably my favorite one and I didn't buy it before it went out! This set is especially nice because it's more cute than scary. Living in the south, most people don't like anything having to do with scary Halloween; they like cute and cuddle Halloween. :-) Just like me! hehe


This vampire card was fun because I stamped a hanging spider inside and gave him googly eyes. Someone will have a little surprise when they open this one!


I have to say that I am really liking the Stampendous cling stamps. Anything to save some room!! The stamps on the envie are just $1 stamps from Michaels. So, this is the card the got the full spray for a background. I really didn't know what my plan was, I just started spraying until I liked it, which is how I also figured out that I needed a few more colors. LOL Hmmm, I bet if I ask hubby, he will think I don't need a single thing. I do have to laugh about this though because my hubby thinks I truly have every single stamp and supply that is out there to have. I told him I can make that come true if he doesn't stop saying that! Boy would that be mean! I need to be nice... he's making dinner tonight. Maybe I'll make brownies... it's raining and feels like a brownies with ice cream for dessert night. Just what my waistline needs!

Anyway, that's it for now. Stay tuned because I have another couple of posts coming out this week. My computer shut down in the middle of me posting (for an update) so I decided to work on a couple of goodie projects for Halloween. I'll share later.

Happy stamping til the next time!

Saturday, September 4, 2010

CK Convention Haul - Part 1

I haven't been to a convention in a couple of years. A friend of mine, Celia, is a semi-new stamper and has never been to a convention. Can you guess what we did? That's right... we went to the convention!! It was in uptown Charlotte so we took the Blue Line (I think it's called) straight from Pineville right into the heart of Charlotte. It was perfect. There was no fighting traffic, looking for parking, PAYING for parking, etc. Celia had to leave early so I decided to forge on ahead and stay until they closed. I had a great time and couldn't believe how many things I saw that I have never seen before. It really was a fun day for me, unfortunately, I paid for it the next day when I couldn't move! Here are the first few pics of what I got...

This was from Heartfelt Creations. They have worked with Spellbinders to have custom dies created that go with their stamps. They also have stamps that go with some of the regular Spellbinders dies. I was so amazed at the beautiful, stunning, gorgeous, extravagant (can't
think of enough words to describe the beauty) cards they had displayed in their booth. I must have spent at least 2-3 hours at the booth in awe of their creations and trying to figure out what the heck I was going to get. When I got to the booth, they were having a very short lull and the gal who was demonstrating had some time to show me the specifics of their stamps and dies. Boy did this make it HARDER to make a purchase decision! Of course I wanted everything, but
my pocketbook wouldn't allow me. :-) Anyway, I ended up with the kit that's pictured above and
bought the stamps and dies in the picture to the right. I tried to get the least amount of stuff that I could do the most with. Don't we all like to do that? I have never worked with Spellbinders dies that have matching stamps. Heartfelt Creations does have a demo on their website that shows the steps you need to go through to get the images properly aligned. Even though I spent so much time at their booth, I still need to go to the website and refresh my memory on how the whole thing was done! I know it's easy, I just can't remember!! Old age setting in I guess...

This was from my stop at Technique Tuesday. I love their stuff, but several of the newer stamp sets I wanted did not arrive in time for the convention. This is my smallest ever purchase from them. I was so good the night before going because I looked at the list of companies that would be at the convention and then went on their websites to see if there was anything I wanted. So, I went with a list that really wasn't very big at all. Where I got messed up was at the Tattered Angels and Heartfelt Creations booths! Money needs to grow on trees....

Now that I'm posting this pic, I realize that I never thought I would fall in love with these darn stamps from Motivet when I saw them on the website! In fact, I didn't even have any of these stamps on my list. They are a company out of Canada, which I've never heard of. I can't remember the name of the other stamp line they carried along with these cuties, but every single sample card was done up for the darn Miss American Card Pageant!

What happened to making very simple but pretty cards that don't have a ton of embellishments on them? I've been stamping for 10 years and I feel a bit intimidated whenever I go to some of these websites. Between the embellishments and MULTIPLE layers... my goodness! Don't get me wrong, I think those cards are absolutely stunning, but for those of us who are more simple stampers, it is hard to look at your cards quite the same way.

Hey, but I almost forgot to spill some wonderful news regarding Tickled Pink, the company I posted about a couple of posts ago... I won (or we think I won) the Kellita digi stamp and for sure recently I won the Kraftin' Kimmie I'm Batty For You stamp or digi stamp... not sure because Kellie is a busy bee trying to move and isn't able to keep up with everything right now. I will update the blog later with a card I will make for Halloween with it. I still have to make a card with the Kellita digi I won. Not sure what I'm going to do yet, but I promise to share in a reasonable period of time. :-) I won the Kraftin' Kimmie because of my comment about Halloween colors so I will post the Halloween cards I made several months ago. They are cute as could be and it's a style card I've never done before. I usually do just a regular "open it up normal" card, so this one was fun. It will be posted tomorrow and I will finish up with the Convention Part 2 post on Tuesday.

OK, this is the last pic for today's posting. I got these stamps at multiple booths and I saved so much money!!! Most of these were $1, the Hero Arts were 1/2 off and the JustRite stamps were on sale too. I fell in love with the JustRite stamps the second I laid my peepers on them. All I have to do is start stamping with them because I already know exactly what I want to do. Hopefully, they will turn out as good as they look in my mind. Don't worry, I will post the cards I make and I won't wait a month in between posts. Besides, I think when you want to join a DT, which is ultimately my goal, you have to post at least 3 times a week... could be a bit more, I'm not sure. So that will force me to do what Ive been wanting to do since I started this adventure!

Happy stamping til the next time!

Cards Cards Cards

I hate that I haven't been able to post much this summer. I've been so busy doing stuff outside and unfortunately since it takes me so much longer than the average person, I feel like I'm never going to get done! Hence, my decision... I am going to make posting a priority because I've come to realize that whether I make time to post or not, everything else (house, yard, etc) is not going to get done any quicker!! 

Supplies are Stampin' Up! unless noted 
Stamps: Awash With Flowers & Teeny Tiny Wishes 
C/S: Melon Mambo, Only Orange, Tempting Turquoise, Whisper White, ? dsp 
Ink: Melon Mambo, Only Orange, Yoyo Yellow, Orchid Opulence, Old Olive 
Tools: scallop edge punch, word window, beautiful wings embosslit, perfect polka dots embossing folder, trimmer, scissors, hole punch 
Misc: Melon Mambo dotted ribbon, rhinestone brad, Hero Arts & other various adhesive rhinestones, glue dots, adhesive, Signo white gel pen, sponge, envelope is not SU!


Here are the cards completely finished as either a Mother's Day or birthday card. The card was actually started in the monthly SU! club I go to. I don't usually finish them completely until I get home and then I never know what I'm going to end up with! Instead of using the melon polka dot ribbon for the "bow" in this card, I used a piece of ribbon from my own stash that matched the melon perfectly. Also, whenever I use embossing folders, embosslits or anything that will give me a design to work with, I will most likely take my white gel pen to it. Recently, I found another white gel pen that works very well and is super inexpensive at Michael's. It's in their individual marker section, by Marvy and called Gel Extreme. The colors available, as far as I can tell, are black, white, red, green, gold, and silver. They have a nice fine point too! I've only been using them for about 2 weeks, but so far so good.


This card was my actual Mother's Day card. I didn't use as many rhinestones on it and the butterflies are the smaller ones that were left over. Still super pretty and my mothers just loved it!

The next card I share is an all occasion style card. I thought it would make a pretty Father's Day card, but then I ended up using something else. The Kraft (or now crumb cake) as well as Sahara Sand cardstock is always so pretty to work with. For some reason those colors give the card an elegant type of look.

Supplies are SU! unless noted 
Stamps: Fifth Avenue Floral, Very Vintage wheel 
C/S: Basic Black, Purely Pomegranate, Sahara Sand 
Ink: Creamy Caramel, StazOn black, AMuse black dye 
Copics: ?? 2 colors used on envelope 
Tools: perfect polka dots embossing folder, trimmer, scissors 
Misc: 5/8" black satin ribbon, Micron 05, Signo white gel pen, pop dots, clear rhinestones, sponge
The finished product! I was very pleased with how this card turned out. It's another that was started at club and I changed it once I got home. Decorating the envelopes is something I love to do because it gives the card a "completeness." I'm not super crazy about how the flower on this card turned out, but it will have to do. :-) I just used 2 Copics and tried to give it a brush stroke look, but it wasn't wanting to cooperate with me. Overall, I really like it. This is one of my favorite sets. One last card and I will REALLY try to post again tomorrow or Monday. Hey, I am trying to turn over a new leaf here...


Card stamps: Hero Arts Friend cling foam stamp 
Envie stamps: AMuse leafy vine, tiny daisy, mini flower 
C/S: AMuse blue kitchen dot & red check, Neenah Classic Crest white 
Card ink: AMuse black dye 
Envie ink: SU! Garden Green, Real Red, Ballet Blue, Yoyo Yellow 
Copics: YG01, YG13, YG67, Y13, Y17, YR16, YR18, B0000, B26, B37, B39, R29, R39, 0 
Tools: trimmer, scissors 
Misc: pop dots, glue dots, Martha Stewart winding leaves ribbon, 2mm & 4mm red rhinestones


Hope you enjoyed the samples. My next post will show some of the goodies I picked up at the CK Convention that was in Charlotte about a month ago.

Happy stamping til the next time!

Monday, August 9, 2010

Cute and Quirky New Stamps

I was surfing the web last night and came across these new (or should I say new for me) stamps that are just too cute, but also quirky looking at the same time. I checked out the DT blogs to see the cards made with these stamps. Wowza is all I can say!  Here is the link to Tickled Pink so you can see the images that are available for purchase:

http://www.kelliewinnell.com.au/shop/index.php?main_page=index&cPath=47&zenid=f74e976728a67015c443d103751a30cd

If you click on Challenge Blog or Blog on the menu that runs across the top of the website, you can see the cards that were made with these images. Looks like I'm going to be ordering a couple of these stamps!! Love 'em!

I'll be posting more later... the Mother's Day card I sent out this year.

Happy stamping til then!

Wednesday, August 4, 2010

Easter Card

Well, better late than never... These cards were inspired by the Stamp Club I attend the first Thursday of the month with Mary Anne Grimmer. Mary Anne always has some really neat projects for us to do. Our club makes 8 cards (2 of each). I really enjoy going over there to have our monthly meetings. She is also the consummate hostess taking care of everyone no matter what they need, something to drink/eat or to help with stamping "issues."

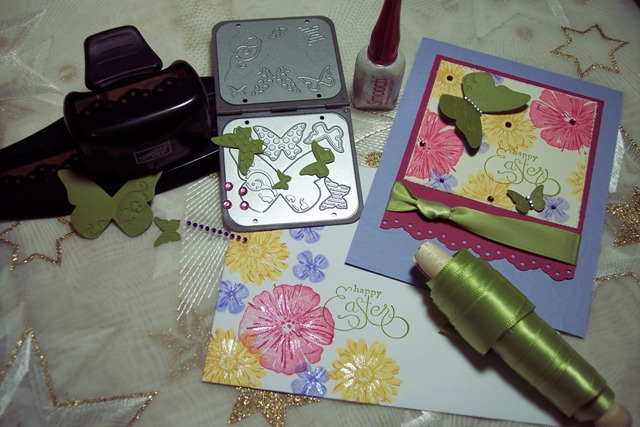
The card below was one of Mary Anne's creations for our stamping club several months back. I don't know if it was supposed to specifically be an Easter card, but once that card comes home with me, I never know how it's going to turn out! Usually pretty darn nice. :-) Once I got it home, I used Smooch ink on all the flowers just to add a little pearly look without being overpowering. Then I stuck some gems on it... very cute!


Supply List: Stamps - SU! Greenhouse Garden & Well Scripted; C/S - SU! almost amethyst, purely pomegranate, old olive, & vanilla; Ink Pads - SU! almost amethyst, old olive, lavender lace, so saffron, more mustard, rose red, ruby red; Supplies - gems (clear, pink, gold, purples), Smooch Illuminate, certainly celery satin ribbon, glue dots, adhesive; Tools - SU! eyelet border punch, distressing tool (from Cutter Kit), SU! beautiful wings embosslits die, Sizzix Big Kick, Genesis trimmer, scissors


The finished card was a huge hit! My family is so supportive of my card making that it's almost embarrassing! They love everything I do! It's great for the ego...

I promise I will get around to posting pics of my garden and I still have the Mother's Day card to post. Tomorrow is my stamp club meeting and doctor appointments. Maybe I can work on it between tomorrow late at night and Friday. We'll see...

Happy stamping til the next time!

Tuesday, August 3, 2010

Catch-Up and Sharing

Lots, lots, lots, lots, lots has been going on since I last posted. Apparently, summer is a bad time to blog. At least for me it is, or maybe just this year is a problem, I don't know. Due to chronic back pain, once the weather breaks and it's nice outside (or even steaming hot), I am outside. The hot weather actually helps somewhat with my back pain. I am also an avid reader and love to garden to the extent that I can. In my last post, I think I mentioned that I had been working on a small garden for 2 months. Lots of work and I can only do so much at a time which is why it took me so long to get done. Is gardening ever really done though? The watering, weed pulling (try not to do that so much), transplanting, fertilizing, etc. takes a bit of time each day. In between I read, read, read. I have probably read about 50 books in the past 3-4 months! I love going to The Book Lady to trade in my books and get some "new" ones. Sometimes they are new and sometimes they are used and old, but the price is right!

Anyway, on to my short back story. Several years ago I fell down some stairs at our house. I thought everything was fine, but as each day came and went, I was getting worse. I did have surgery, unfortunately there were other things that started to come up physically after the surgery. Nearly the last 8 years have been spent in constant pain. I have been on so many medications, gone through depression, had so many spinal injections, a nerve burning, and finally because there was nothing left to try, my doc suggested going through a trial for a spinal cord stimulator. Since I had nothing to loose, I decided to give it a try.

The trial went well, but was EXTREMELY painful because I had to be completely AWAKE for the whole thing! It was like nothing I've ever felt. Why is it a male will equate the fact that you've had a baby with you being able to stand any amount of pain you could possibly go through? Anyway, a few days later, I could tell there was some relief and decided to go ahead with the actual installation. It's been 4 weeks since I had the surgery, which I was knocked out for thank God!! This procedure is by no means a cure for my problem, it kind of (hopefully) just takes the place of taking all the medicine. THAT, is something I can't wait to do --- get off all the meds. The hardest one to get off of will be the fentanyl patch. I've already tried doing it too fast and have experienced withdrawal symptoms. Not fun! So instead of getting off the patch in a month like I wanted, it will probably take a few months. Can you tell I'm a bit impatient? The stimulator interrupts the signal of pain just like the meds do sort of masking the pain, but I think the stimulator does a much better job. I am still limited to what I can do because I can still get flare ups from over doing it and end up in bed. Hopefully my time in bed will be much less now. The true test will come when the weather gets cold.

I was very lucky that my sister came before the surgery and stayed for a few days after. Then my mother came for 2 weeks. It was nice they could get away and come stay with me. My mother did all kinds of stuff in the yard so I could just continue with my regular garden routine. One thing she did was to build a compost pile. Woo hoo!! It didn't end up being a single compost pile though. We had 3 beds that had been used for raised bed gardening prior to us moving into this house which we had been dumping yard trash on for the last 8 years. So, Mom got some plastic fencing and fenced in all 3 beds. These compost piles are HUGE!! I bet each one is 3 times bigger than a normal compost pile. :-) It's great to have it though because I thought hubby was going to have a heart attack buying all the dirt I needed for my containers. That's how I've gardened over the years, in containers. He dug holes for me and I tested out a small area for planting so next year everything will be in the ground. I have lots of work for him to do this fall in order to prepare for next years garden... In the end, it will be less work.

Below is a card I made as a thank you to my sister for coming to help out. She absolutely loved the card! Of course I used my copics!! I even worked it out that I got our hair colors right. This card was inspired by some wrapping paper I bought at Paper Source. It's funny how one little item determines exactly how you are going to create your card. The wrapping paper made me want to make my own background paper based on the design which in turn made me want to use the sisters stamp by Penny Black. It turned out pretty nice if I may say so myself!


I have been taking pics of the cards I've been working on during this hiatus from my blog. I can only hope I do a better job posting than I have been doing. Tomorrow I will post my Easter card. It's a card that was made at a SU! stamp club I go to. I just messed around with it and finished it up when I came home. Something I do frequently...

Happy stamping til the next time!